
I’m a recent convert to Playwright. Having worked mainly on Node.js projects before joining Hippo, I’ve been spoilt by being able to use Cypress for end-to-end testing. But, as I ventured into the world of .NET the only serious choice seemed to have been Selenium (which is showing its age in my opinion).
Enter Playwright! With a ton of locators and features out-the-box such as trace viewers, multiple contexts, and auto-waiting, it is a very powerful framework. And after having a play with it in my own time, I saw an opportunity to implement it as a replacement for Selenium on a complex .NET project that I was working on at Hippo.
However, some of the requirements for this project meant it wasn’t going to be a simple setup:
- I wanted the whole project team to collaborate on the test cases, so the test scenarios needed to be written as Gherkin scripts using SpecFlow.
- Many of the scenarios that I wanted to test included the same pages and components. So I needed to implement Page Object Models (POMs) to keep things maintainable.
- There was also a need for multiple contexts, trace viewers, and SpecFlow files to a LivingDoc. But I’ll save these topics for future blogs
I set about reading through the framework docs and searching the web for articles and examples that used Playwright, SpecFlow, and POMs together. After a few weeks, I hadn’t found much at all.
So, instead, I went about figuring it out myself along with the help of some brilliant colleagues within the Engineering and Data community at Hippo.
The following step-by-step guide is a basic summary of how I ended up implementing it (to save you the head-scratching). I’m quite new to C#/.NET and parts of this seem really obvious to me now. But, it was all a learning curve.
Enjoy!
Pre-requisites
1. Install the SpecFlow IDE plugin (recommended)
This plugin comes highly recommended as it provides you with a project template for SpecFlow and tools for working with Gherkin feature files.
2. Create the project
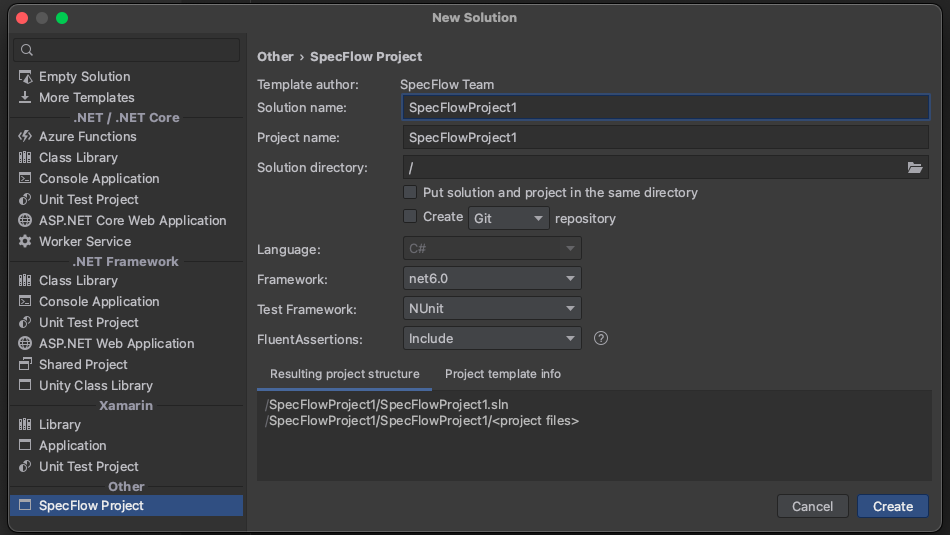
If you installed the SpecFlow plugin for your IDE, create a new project using the SpecFlow project template.
Alternatively, create an empty project with the following directories:
NewProject/
│
├──Drivers/
├──Features/
├──Hooks/
└──Steps/
I’ll outline what these are used for later on.
3. Install Playwright
Install the NuGet package for Playwright into your newly created project.
4. Install SpecFlow.NUnit
Install the NuGet package for SpecFlow.NUnit.
Setting up your hooks
What are hooks?
The hooks file(s) are used by SpecFlow to perform additional automation logic at specific points. This includes before/after the test run or scenario.
Why do we need them with Playwright?
In a simple Playwright setup, without SpecFlow and POM, you could put all of the setup in a task that we call at the start of each test file. However, SpecFlow’s test cases are driven from the Gherkin-format feature files. So it’s the simplest option to put the setup in the hooks file.
Playwright setup in hooks
The following code contains the Playwright setup for 1 context. This goes in the hooks.cs file within /hooks. Read through the comments for details of each part.
using Microsoft.Playwright;

namespace PlaywrightSpecFlowPOM.Hooks
{
    [Binding]
    public class Hooks
    {
        public IPage User { get; private set; } = null!; //-> We'll call this property in the tests

        [BeforeScenario] // -> Notice how we're doing these steps before each scenario
        public async Task RegisterSingleInstancePractitioner()
        {
            //Initialise Playwright
            var playwright = await Playwright.CreateAsync();
            //Initialise a browser - 'Chromium' can be changed to 'Firefox' or 'Webkit'
            var browser = await playwright.Chromium.LaunchAsync(new BrowserTypeLaunchOptions
            {
                Headless = false // -> Use this option to be able to see your test running
            });
            //Setup a browser context
            var context1 = await browser.NewContextAsync();

            //Initialise a page on the browser context.
            User = await context1.NewPageAsync();
        }
    }
}
If you only need one browser context for all of your testing, you could configure this without declaring the IPage User property. However, setting and calling this gives us more control over the browser context (to be continued…).
Write your first feature file
The Gherkin-format ‘feature’ files are where you put your test scenarios together. Any test code that you write will be bound to the lines within these files.
In this example, we’re going to write a test that goes to the Playwright website by searching for ‘Playwright’ on DuckDuckGo.
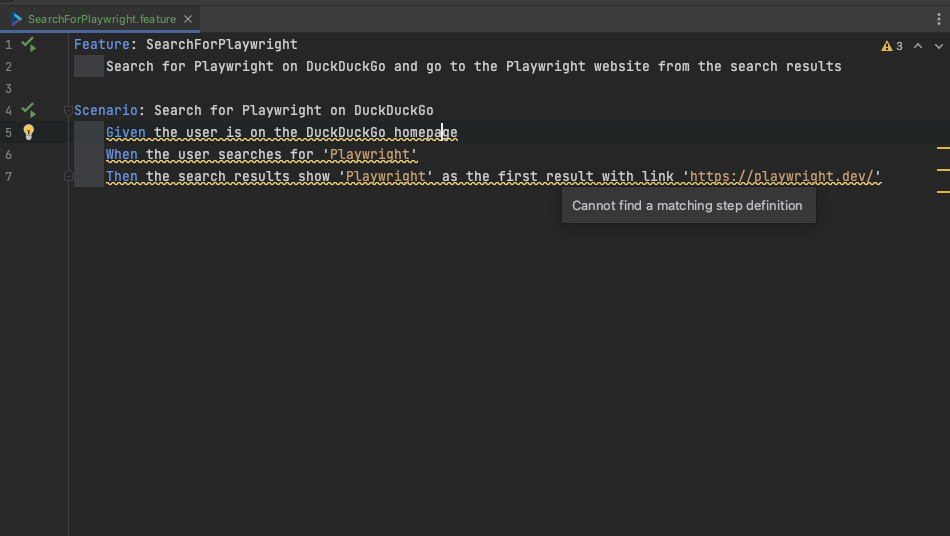
Create a new .feature file in the /Features directory. Then add the following Gherkin content:
Feature: SearchForPlaywright
	Search for Playwright on DuckDuckGo and go to the Playwright website from the search results

Scenario: Search for Playwright on DuckDuckGo
	Given the user is on the DuckDuckGo homepage
	When the user searches for 'Playwright'
	Then the search results show 'Playwright' as the first result with link 'https://playwright.dev/'
If you’re using the SpecFlow plugin, you’ll notice that when you add this code the lines under the scenario are underlined in a warning (as shown below). This is because there are no step definitions currently bound to these lines.
Writing Page Object Models (POMs)
Before we add the step definition code, you’re going to need to write our Page Object Models. This will provide you with the actions and assertions that you’ll then use in the step definition.
For this example, you’re going to need two Page Objects:
- The DuckDuckGo homepage
- The DuckDuckGo search results
Writing a POM for the DuckDuckGo homepage
Create a new directory for /Pages and add a .cs file to it called ‘DuckDuckGoHomePage’.
I prefer to follow a pattern with the page object models, splitting them into 3 parts:
- Constructors
- Selectors
- Actions and assertions
Constructors
The constructor sets up a reference to the IPage User parameter that’s declared in the Hooks file.
private readonly IPage _user;

public DuckDuckGoHomePage(Hooks.Hooks hooks)
{
    _user = hooks.User;
}
Selectors
This is where all of the page objects (DOM elements) are declared that you want to use in your actions and assertions. Don’t be tempted to write selectors for everything shown on the page. If you’re not going to use an object, don’t waste your time writing it in
private ILocator SearchInput => _user.Locator("input[id='search_form_input_homepage']");
private ILocator SearchButton => _user.Locator("input[id='search_button_homepage']");
Actions and assertions
This region does exactly what it says on the tin! Anything that you actually want to do with your selectors should be written here as Tasks or Voids etc.
In this case, you want an assertion that checks that the test is on the correct page and all the right objects are showing. And also, an action to type in a search term and press ‘enter’.
public async Task AssertPageContent()
{
    //Assert that the correct URL has been reached
    _user.Url.Should().Be("https://duckduckgo.com/?");

    //Assert that the search input is visible
    var searchInputVisibility = await SearchInput.IsVisibleAsync();
    searchInputVisibility.Should().BeTrue();

    // //Assert that the search button is visible
    var searchBtnVisibility = await SearchButton.IsVisibleAsync();
    searchBtnVisibility.Should().BeTrue();
}

public async Task SearchAndEnter(string searchTerm)
{
    //Type the search term into the search input
    await SearchInput.TypeAsync(searchTerm);

    //Assert that the search input has the text entered
    var searchInputInnerText = await SearchInput.InputValueAsync();
    searchInputInnerText.Should().Be(searchTerm);

    //Click the search button to submit the search
    await SearchButton.ClickAsync();
}
Completed DuckDuckGo homepage POM file
Once you’ve added these, your DuckDuckGoHomePage.cs file should look like this:
using FluentAssertions;
using Microsoft.Playwright;

namespace PlaywrightSpecFlowPOM.Pages;

public class DuckDuckGoHomePage
{
    private readonly IPage _user;

    public DuckDuckGoHomePage(Hooks.Hooks hooks)
    {
        _user = hooks.User;
    }

    private ILocator SearchInput => _user.Locator("input[id='search_form_input_homepage']");
    private ILocator SearchButton => _user.Locator("input[id='search_button_homepage']");

    public async Task AssertPageContent()
    {
        //Assert that the correct URL has been reached
        _user.Url.Should().Be("https://duckduckgo.com/?");

        //Assert that the search input is visible
        var searchInputVisibility = await SearchInput.IsVisibleAsync();
        searchInputVisibility.Should().BeTrue();

        // //Assert that the search button is visible
        var searchBtnVisibility = await SearchButton.IsVisibleAsync();
        searchBtnVisibility.Should().BeTrue();
    }

    public async Task SearchAndEnter(string searchTerm)
    {
        //Type the search term into the search input
        await SearchInput.TypeAsync(searchTerm);

        //Assert that the search input has the text entered
        var searchInputInnerText = await SearchInput.InputValueAsync();
        searchInputInnerText.Should().Be(searchTerm);

        //Click the search button to submit the search
        await SearchButton.ClickAsync();
    }
}
Adding the search step definition
At this point, you’ve got a page object which covers the home screen including doing a search and asserting the results. You’ve also written the feature file. So, you now need to write some step definitions.
The step definitions act as the bridge between the feature file and your actual test code.
Setting up a step definition file
Within the /Steps folder, create a new class called ‘SearchSteps’. You’re going to put any steps that relate to going to a new page in this file.
Steps files can be organised in any way you want, containing all or particular step definitions. SpecFlow will read any steps definition, from any steps file as long as the class has the [Binding] attribute.
namespace PlaywrightSpecFlowPOM.Steps;

[Binding]
public class SearchSteps
{
}
In order to use the POM, there are a few more things you also need to add a constructor that uses the hooks and DuckDuckGoHomePage.cs POM class from earlier.
using Microsoft.Playwright;
using PlaywrightSpecFlowPOM.Pages;

namespace PlaywrightSpecFlowPOM.Steps;

[Binding]
public class DuckDuckGoSearchSteps
{
    private readonly IPage _user;
    private readonly DuckDuckGoHomePage _duckDuckGoHomePage;

    public DuckDuckGoSearchSteps(Hooks.Hooks hooks, DuckDuckGoHomePage duckDuckGoHomePage)
    {
        _user = hooks.User;
        _duckDuckGoHomePage = duckDuckGoHomePage;
    }
}
Notice how I’ve also included the home screen POM in my constructor here ready for the steps we’re going to add.
Create a new step from the feature file
Now we move over to the feature file. If you’re using the SpecFlow plugin for Rider or VS code you’ll have an error action list option for each of the undefined steps within the file.
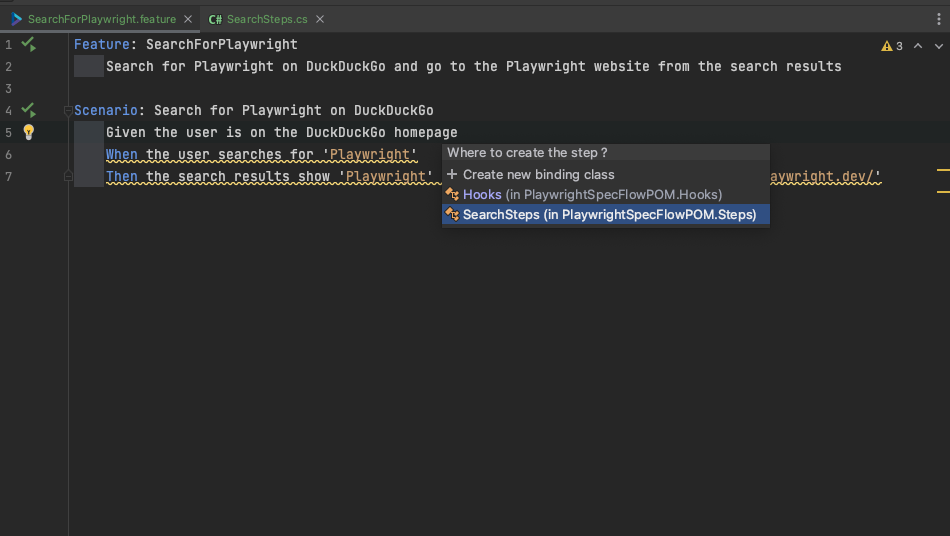
Click on the error helper and the ‘create step’ option should be shown. A list should then appear that contains the SearchSteps file you just created.
That new step will now appear in the SearchSteps.cs file, and the respective line in the feature file is no longer in error.
 [Given(@"the user is on the DuckDuckGo homepage")]
public void GivenTheUserIsOnTheDuckDuckGoHomepage()
{
    ScenarioContext.StepIsPending();
}
SpecFlow generates the step as a void with a ‘step pending’ function within it. However, for Playwright tests, you’ll usually end up changing these to async Tasks (like below).
Now add some actual code to the step definition that you just created.
 [Given(@"the user is on the DuckDuckGo homepage")]
  public async Task GivenTheUserIsOnTheDuckDuckGoHomepage()
  {
      //Go to the DuckDuckGo homepage
      await _user.GotoAsync("https://duckduckgo.com/");

      //Assert the page
      await _duckDuckGoHomePage.AssertPageContent();
  }
This step definition is now complete.
Adding the search step to the same file
Following the same process as above, add a step definition for the next feature file line to the SearchSteps.cs file.
[When(@"the user searches for '(.*)'")]
public async Task WhenTheUserSearchesFor(string searchTerm)
{
    //Type the search term and press enter
    await _duckDuckGoHomePage.SearchAndEnter(searchTerm);
}
As you can see, this step has been parameterised with the (.*) attribute. This will allow you to change this parameter (if you want/need to) within the feature file without having to change any code.
Completed SearchSteps.cs file
After adding these steps, your file should look like this:
using Microsoft.Playwright;
using PlaywrightSpecFlowPOM.Pages;

namespace PlaywrightSpecFlowPOM.Steps;

[Binding]
public class SearchSteps
{
    private readonly IPage _user;
    private readonly DuckDuckGoHomePage _duckDuckGoHomePage;

    public SearchSteps(Hooks.Hooks hooks, DuckDuckGoHomePage duckDuckGoHomePage)
    {
        _user = hooks.User;
        _duckDuckGoHomePage = duckDuckGoHomePage;
    }

    [Given(@"the user is on the DuckDuckGo homepage")]
    public async Task GivenTheUserIsOnTheDuckDuckGoHomepage()
    {
        //Go to the DuckDuckGo homepage
        await _user.GotoAsync("https://duckduckgo.com/");

        //Assert the page
        await _duckDuckGoHomePage.AssertPageContent();
    }

    [When(@"the user searches for '(.*)'")]
    public async Task WhenTheUserSearchesFor(string searchTerm)
    {
        //Type the search term and press enter
        await _duckDuckGoHomePage.SearchAndEnter(searchTerm);
    }
}
Adding a POM for the search results page
At this point, you’re done with the DuckDuckGo home page and now need to focus on the search results page. This requires another POM.
You should set this up in the same way as the DuckDuckGoHomePage POM but with the name ‘SearchResultsPage’ and with the following code:
Constructors
Add a constructor with the hooks class like in the first Page Object Model from earlier on.
Selectors
The following selectors give us what we need to be able to assert both the search input and the page results shown.
    private int _resultIndex; //-> this is being set in the action/assertions below

    private ILocator SearchInput => _user.Locator("input[id='search_form_input']");
    private ILocator SearchResults => _user.Locator("div[id='links']");

    //Notice how the selector below uses the 'SearchResults' locator instead of the IPage to locate the element
    //The 'nth' locator is used to select an element at a specific index when there are multiple elements found
    private ILocator ResultArticle => SearchResults.Locator("article").Nth(_resultIndex);

    //We're using the single search result that we've located as 'ResultArticle' to locate the next 2 selectors
    private ILocator ResultHeading => ResultArticle.Locator("h2");
    private ILocator ResultLink => ResultArticle.Locator("a[data-testid='result-title-a']");
Actions and assertions
You can then put in some assertions that will check the page content, to ensure the test is on the correct page. And then also check that the first result has the text and link that we expect it to have.
public async Task AssertPageContent(string searchTerm)
{
    //Assert the page url
    await _user.WaitForURLAsync($"https://duckduckgo.com/?q={searchTerm}*");

    //Assert the search input has the search term
    var searchInputInnerText = await SearchInput.InputValueAsync();
    searchInputInnerText.Should().Be(searchTerm);
}

public async Task AssertSearchResultAtIndex(string searchTerm, int resultIndex, string expectedResultLink)
{

    _resultIndex = resultIndex;

    //Assert the first result text
    var firstResultInnerText = await ResultHeading.InnerTextAsync();
    firstResultInnerText.Should().Contain(searchTerm);

    //Assert the first result link
    var firstResultLink = await ResultLink.GetAttributeAsync("href");
    firstResultLink.Should().Be(expectedResultLink);
}
Adding the search result steps file
Following the same process as earlier on, create a steps file for the search results. The constructor for this will need to include the SearchResultsPage class.
private readonly SearchResultsPage _searchResultsPage;

public SearchResultSteps(SearchResultsPage searchResultsPage)
{
    _searchResultsPage = searchResultsPage;
}
Add the steps using the helper on the feature file line error. As with the others, this step needs to be parameterised and made an async Task instead of a void.
[Then(@"the search results show '(.*)' as the first result with link '(.*)'")]
public async Task ThenTheSearchResultsShowAsTheFirstResultWithLink(string expectedResult, string expectedLink)
{
    ScenarioContext.StepIsPending();
}
We then just need to call the tasks in the SearchResultsPage POM with the expectedResult and expectedLink strings. So it becomes:
[Then(@"the search results show '(.*)' as the first result with link '(.*)'")]
public async Task ThenTheSearchResultsShowAsTheFirstResult(string expectedResult, string expectedLink)
{
    //Assert the page content
    await _searchResultsPage.AssertPageContent(expectedResult);

    //Assert the first search result (hence the index of 0)
    await _searchResultsPage.AssertSearchResultAtIndex(expectedResult, 0, expectedLink);
}
And with that, we have our completed test!
Running the test
Playwright is really simple to run, either by using the test controls in your IDE or running dotnet test in terminal at your project root.
Taking a closer look
I hope this basic tutorial has been useful to you.
If you’d like to have a closer look at the example from this post, the full solution is available on GitHub: https://github.com/hippo-digital/playwright-specflow-pom-dotnet-c .